How to Use This Blog

Since we have lots and lots of videos here, you will need to know the best way of finding what you are looking for. Each post has the video(s) of the topic it is about. Sometimes there will be more than one video that is a continuation of the previous one. These videos will be posted together within the same post. To find what you are looking for, either use the search box or the list of categories posted in the right column.


The IQ system is constantly evolving, so please keep in mind that some of the older videos may show features that have been replaced by newer ones, or buttons that have changed position or names. However, the videos have not been removed because the methods demonstrated are still valid.


Saturday, May 26, 2018

Echoing multiple patterns.

Echoing multiple motifs.
                            

It is possible to echo multiple patterns. When you get to the screen where you are asked to select the patterns to echo, touch as many as necessary. In the photo above, I touched both the hearts. I set the number of repeats, gap, and other settings to my liking and iQ filled the background with echoes. 
In some instances there may be spaces left between the patterns that are larger than you'd like, so try altering the gap until you get a satisfactory result.  

This image shows multiple motifs echoed. The block has not been defined as a clipping block. This type of echoing could be used in a border. When the choice of which pattern to echo has to be made, touch all the motifs you want to echo.


Echoing Applique

Echoing Appliqué.

To echo around an appliqué, the perimeter of the appliqué needs to be traced first.
Select Add Block then either trace on quilt or mark on quilt. I often take a short cut here and select trace on quilt, lift the motors then set my machine to regulated stitching and manually stitch in the ditch around the appliqué as I trace. If you do this, remember to touch ‘start’ on iQ before stitching. It’s very frustrating to think you’re tracing only to glance up at the screen and see nothing. Don’t forget to touch stop at the end too.
The outline of the appliqué is now entered as a block on iQ but it needs to be a pattern in order to create echoes.
On the Add/Edit block page, select Block to Pattern. If you need to keep the original block to use as a no-sew zone or clipping block later, copy the block and move the copy to one side before you change it into a pattern.


On a quilt with many appliqués that all look the same, such as Sunbonnet Sue, it will be necessary to trace the outline of each appliqué because no two will be the same. It won’t be possible to copy the first echoes created and use them for every appliqué. Although this does take a little time to set up, the results will be well worth the effort.

Filled Echoes

Filled Echoes.

This type of echoing looks most effective when the shape to be echoed is not too complicated. A smooth shape works the best. It does take more time to set up and stitch out but looks wonderful.

To create these filled echoes, I first set my pattern in the block then chose Add Pattern > Echo Pattern  and touched the pattern I wanted to echo. Continue.
I set my initial number of echoes to fill the block (in this example , that was about 13) with a .25 gap. I set the smooth to 25% because I was going to use every other echo as a path so making them smooth allowed the path pattern to follow them more pleasingly. Gap progress :0% and Points: rounded. Finished.
This time I set the transition to none.
Add/Edit Block > Add Block > Clipping Block.
I touched all the echoes that extended beyond the block and selected jumpstitch as the transition.
   
Before adding the fill, I needed to split all the patterns that were linked with jumpstitch lines.
Add/edit pattern > split pattern. I touched all the green jumpstitch lines around the edge of the block until there were none remaining. You can touch anywhere along a jumpstitch to split it, then it will simply disappear.
Finished.

Add/Edit Pattern > Add Pattern > Path Pattern. I touched the first echo line that I wanted to turn into a fill. (In the screenshot above, you can see the line I chose because it's red.) I chose pearls to follow the path and increased the number of repeats until they filled the space between the adjacent echo lines. Notice how the pearls are a little distorted, if I wanted them to be more rounded, I would have to make the echoes smoother at the initial set up.
 

I repeated those steps until I had all the filled echoes in place.

Next I deleted all the echoes that I had used as paths. Zooming in really helps here.
Finally, I needed to do some clipping so I touched Finished > Add/Edit Block > Add Block > Clipping Block.
I touched Select All > Continue > Select Existing Block, and touched the square > Finished. I chose continuous as the transition because I'm only clipping the pearls at this stage so the continuous transition at the edge of the block would be very small..
This leaves the clipped pearls flattened at the edges, as can be seen in the image at the beginning of this section. If that’s not acceptable, use either shape shift or smooth to round them out.

When setting up the stitching sequence, you will have to tell iQ to stitch each echo and fill in turn. This allows you to customise the order in which they stitch out.
 

Grouped Echoes

Grouped echoes.

These really look special on a quilt and they would be nearly impossible to do freehand.


For the double echoes above, start by placing the pattern you want to echo in a block.
These are the next steps.
Add Pattern > Echo Pattern > touch the pattern you wish to echo. Continue.
Set the repeats to 2, gap to .25, smooth to 0%, gap progress 0%, points sharp.
Touch the area outside the pattern.
Touch finished and chose jumpstitch as the transition. Finished.
Add/Edit Pattern > Add Pattern > Echo Pattern > this time select the echoes, not the original pattern, as the pattern to echo. Continue.
For this example, I set the repeats to 4 and the gap to .75 then touched the area where I wanted the echoes.
The echoes will spill out beyond the block so it will be necessary to create a clipping block to remove the excess echoes, just as described in the first echo post. 
You can see in my screenshot that I left the clipping block transition as jumpstitch (the green lines indicate that) This is a faster choice than splitting and combining but there will be lots of threads to trim away. If you choose jumpstitch, remember to set iQ to do backstitches.
Alternatively stop to cut threads could be chosen, but selecting continuous will create a lot of over stitching along the outside edge of the block. 
To find out which transition you prefer, set this block pattern up three times on a practice piece and try each transition to see which one you prefer. 
I would only split and combine the echoes into a different stitching path if I was working on a really special quilt. Usually jumpstitch works well because the little back stitching is hidden in the seam ditch of the block.

This same method can be used to create triple echo lines or any number you please.  Set the initial echo repeats to what you want. You must touch finished, not accept, on the echo pattern page even though you want to place more echoes.  This is because you need to choose a different pattern to echo.


Uneven Spiral Echoes

Uneven spiral echoes.

This screenshot shows spiraling echoes inside and outside the feather.
The outside echo lines are not evenly spaced. I changed the gap progress on the echo pattern page to create this effect.  Gap progress is a percentage. Set at 25%, for instance, each gap between the echo lines will get 25% larger.  Touch the +/- button to make each gap 25% smaller.

After placing the outside echoes, I touched accept not finished.  Touching finished exits the echo pattern page. Touching accept returns you to the echo pattern page after selecting the transition for these first echoes.

I chose spiral for my outside echoes and adjusted the start point to a more pleasing position by dragging it on the screen. Touching finished returned me to the echo pattern page.

I touched the inside of the feather to place echoes there and made changes to the number of repeats, gap, and gap progress.
This was the last set of echoes I wanted so I touched finished and chose spiral as the transition. The spiral looks a bit odd (look on the left hand side for sharp transitions between the starts and ends), so I moved the start/end points to smooth the lines as much as possible.


They couldn’t be completely smoothed to my liking, so I chose smooth pattern after finishing on the echo pattern page and cleaned up the spiral.


Friday, May 25, 2018

Echoes

ECHOES.
It is possible to echo both inside and outside spaces of a pattern, and to echo multiple patterns. iQ stitches echoes beautifully. They stitch out relatively fast and look very impressive. Each pattern to be echoed on a quilt, even if they seem identical, will need to be set up with echoes individually. This does take extra time so adjust your fee accordingly, if the quilt is for a customer.

Simple background echoes.

These are the steps for creating the echoes in this illustration, starting after the motif is in place.
Add pattern > echo pattern > touch the motif > continue.
I wanted the echoes outside my motif so I touched that space.

There are several choices to make on this page. Notice IQ always starts with 10 repeats, a gap of .25” and smoothing at 25% as the default. All these can be changed to suit the project.
 
I changed the gap to make the distance between the echoes larger. I changed the number of repeats so that they filled my block. Of course, some of the lines extended outside the block. I changed the smooth to 0% because I wanted the echoes to mimic the motif as closely as possible.
I did not alter gap progress or points.
Finished. (I would have selected Accept here if I had wanted to return and add more echoes to other areas of the pattern.)
Now I had to choose whether to keep all the echo lines as separate patterns or combine them together.  The advantage to combining the echo lines comes when the stitching sequence is set up. If I kept the echoes separate by choosing the transition: none, then I’d have to touch each echo line when sequencing.  Combining the echoes, allows me to just touch the echoes once because IQ will see them all as one pattern.
I chose jumpstitch as the transition by touching transition then the + sign to change the option.
I did not change the sequence – I kept it at consecutive.
Finished.

My next step created a clipping block to get rid of the extra lines that extend outside the block.
Add/edit block > add block > clipping block > I touched the echoes > continue > select existing block > I touched the square block > continue
The next page showed the echoes clipped, as I wanted them so I touched finished which led me to another clipping confirmation page. I chose jumpstitch because I wanted to do some editing of the stitching path in order to reduce the number of times IQ would move around the block.  The echo lines are circular so where they are clipped, IQ would stitch one short section, move to the next corner to stitch the next short section and so on, time after time for each clipped echo. This would create a huge build up of thread along the edge of the block. I want the stitching to be more continuous. Choosing jumpstitch here allows me to split more easily.
Accept > yes > finished > add/edit pattern > split pattern
I touched each jump stitch line at the outside edge of the block in turn followed by split. It's not necessary to zoom in and carefully touch the green jump stitch line at either the start or end point, touching it anywhere, and then touching split will cut the jump stitch out. Keep touching the edge of the block until there are no more jump stitches to split out. You will see a lot of S and E points.
My next step was to combine each set of short echo lines in the corners together. I selected Combine Pattern then thought about how I wanted these echoes to stitch and touched each in turn in the order that they'd stitch out.
(Shirley Higginbotham has a video, titled spiral echo, showing this process)
In the screenshot at the start of this section, you can see a long blue line going from the last full echo to one of the corners. This indicates a tie off. After combining the short corner echoes into patterns, I then combined all the echoes together again, choosing tie off as the transition


Filled Rays

Filled Rays.

    
Filled rays take a little longer to set up initially. If one repeat or filled ray is saved (the left hand image below), the set up can be customized for each quilt by altering the number of rays and space between them. Alternatively a complete ray fill pattern can be saved (the right hand image below).
     
               
These are the steps for making a filled ray.
Set up a block 10”x10”. Finished.
Choose the straight line from the geometric catalog.
Turn on the grid and change it to ½”. Turn snap on.
Move the start of the line so it snaps to a grid intersection. Use stretch to anchor the start then move the end to a grid intersection at the opposite side of the block, one square below the grid line that the start is on. Finished.
Copy pattern > touch the line, continue.
Move the copy so that it is right on top of the original line. Select Stretch and anchor the start. Move the end so that it is two squares above the end point of the original line. Finished.
Copy pattern > touch one of the lines, continue.
Move it so that the start snaps to the narrow end of the rays. Use stretch to anchor that point and move the end so that it is centered between the two rays, snapping it to the grid intersection half way between the rays.
Two rays are now complete and a fill can be added using path pattern. The path will be the center straight line. Save this rays fill design template if you want to use it again in the future. It has to be saved as a quilt because the lines are not combined.
                                        
Add pattern > path pattern > select the centerline of the rays. Continue.
You can choose any pattern that you think will make a good-looking fill. I chose half circle 2 from the geometric catalog and increased the repeats to 30. Finished.
 

Add/edit pattern > modify pattern, select the wavy line, continue.
Touch the double arrows and select distort. Move the small green squares so that the pattern fills the space between the two rays.
 

I make the fill start a little way up from the point because a no-sew zone will nearly always remove that area. The fill at the center would be just too small to sew anyway.
This is a zoomed in image – the grid is ½”.
  

Finished.
Now the two rays and the fill need to be combined. Combine patterns. Touch the top ray, flip the start/end, continue > touch the fill, continue > continuous stitch line. Touch the bottom ray, flip the start/end, continue > continuous stitch line. Finished.
Delete pattern > touch the center straight line (the path), continue > yes.
Save this pattern.

To make a complete circular pattern follow these steps.
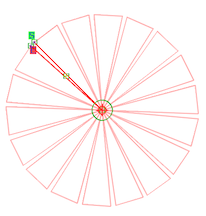
Add/edit pattern > add pattern > fan pattern > touch the ray pattern, continue.
Repeats 15. Angle 24º. It looks strange – don’t worry.
     
Grab the start point and drag it to the end point.
     
Close pattern: yes. Alternate: off. Transition: continuous.

If you want different spacing, change the angle and number of repeats. Try 18 repeats and 20º. Try 36 repeats with 10º.  As long as the two numbers multiplied together make 360, you will get a complete circle with no double stitched rays.
Finished. If you like this spacing, save the complete circular ray pattern.

Add/edit pattern > modify pattern > touch the rays > continue.  Move the rays so they are centered over the block. Scale the pattern down if you want the fill to be dense. Play with the scale and notice the difference.
Finished  > finished > add/edit block > add block > clipping block > select the rays > continue > select existing block > touch the square > continue > finished > transition continuous, accept > yes.
 
Finished > add/edit pattern > add pattern > block pattern > use current block  > choose a motif. (I chose Betty Flower.)
Scale down the motif, finished > finished > add/edit block > add block > no-sew zone > select the rays, continue > create pattern contour, touch the motif > continue. Follow the instructions, set smooth to 0%. Finished > finished.
This filled ray will have a transition at the no-sew zone so consider which transition to choose. If you choose tie- off, you can manually stitch in the ditch around the motif between the rays, but continuous or jumpstitch may be good choices depending upon the intricacy of the no-sew zone.
                                  

In order to eliminate the transition at the no-sew zone, it’s necessary to double stitch part of a filled ray. If thin thread is used, the double stitching may not be noticeable. I prefer to double stitch the fill because that will eliminate a transition at the clipped fill at the outside edge of the block.

Having placed the fill pattern, it is then copied and placed on top of the original.
                                 

The rays and fill are combined as follows. First one straight ray with the start at the wide end.
                                  

 Next the fill with the start at the narrow end (these two will be combined with continuous stitch).
                                  

Next the fill copy with the start at the wide end, and finally the other straight ray with the start at the narrow end. The transition from the fill to this straight ray will be continuous.
                                  

These instructions lead to a relatively narrow filled ray. If you prefer a wider one, set the two rays further apart at the start.
Notice the difference between these two. They both have the same number of filled rays.
The filled ray on the left was designed wider and with fewer pattern repeats along the length of the ray.
 

Wavy Rays.

Wavy Rays.


These were created in a two-step process first creating a path pattern, and then fanning that path pattern.
First make a block then follow these steps:
Add/edit pattern > add pattern > block pattern > use current block.
Select the straight line from the geometric catalog.
Move it so the S snaps to the center of the block.  Select stretch and anchor the start point.  Grab the end point and move it to one of the corners. Finished.
Add pattern > path pattern > select the straight line > choose arc-2 from the geometric catalog.
Decrease the number of repeats to 4. Finished
Add/edit pattern > delete pattern > touch the straight line > continue > yes.
Copy pattern – touch the wavy line > continue > place the copy right on top of the original > finished > combine patterns > touch the wavy line > continue > touch the wavy line again (you’ll see a pink line) > swap start/end points > continue > finished
Add pattern > fan pattern  > select the wavy line > continue.
Change the angle to 10º and repeats to 36. Grab the pivot point and move it to the other end of the wavy line. Transition: continuous. Close pattern: yes. Alternate: off.
Save the pattern.

NOTE: If arc-2 in your geometric catalog is not horizontal, it will not connect as a continuous wavy line along the path. It must be altered and saved as a horizontal pattern. The same is true for arc.

Try pathing other patterns – the rays don’t have to be straight lines. You will see a lot of overlapping at the center but since a no-sew zone will delete this area, the overlapping doesn’t matter.


Double Rays

Double rays.

Note: following these directions will be easier if you have read and followed the steps in the post about creating single straight rays.
 

These rays are not double stitched but the transition at the no-sew zone is so small that it can be stitched continuously.
I made these rays by fanning a straight line.
First make a block then follow these steps:
Add/edit pattern > add pattern > block pattern > use current block.
Select the straight line from the geometric catalog.
Move it so the S snaps to the center of the block.  Select stretch and anchor the start point.  Grab the end point and move it to one of the corners. Finished.


Add pattern > fan pattern – touch the straight line > continue >
Change repeats to 2 and angle to 3º. Alternate: on. Transition: continuous. Close pattern: no. Finished.
Add/edit pattern > add pattern > fan pattern > select the pattern > continue. It will look strange at this stage but don’t worry.


Change the repeats to 18 and angle to 20º.
Grab the pivot point (the start point) and drag it to the other end of the rays.
Alternate: off. Transition: continuous. Close pattern: yes.
Now it should look like this screenshot.
Finished.

Save the pattern.

By altering the number of repeats and the angle between them, you can create several variations of background double rays.