Row height is the only number that can be changed by using the keypad. Changing the row height simply changes the scale of the pattern and therefore the number of rows, as shown here. The first screenshot shows the row height at 12", so there are only 5 and a bit rows on this quilt. The second screenshot shows a reduced row height of 5", which increases the number of rows and scales down the whole design.
Pattern Height is a combination of Row Height and Gap, or to put it mathematically correct, pattern height = row height - gap.
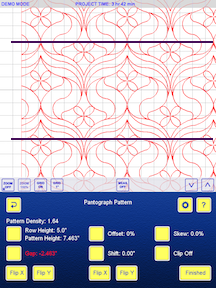
Pattern Height only changes when the gap, or space, between the rows is either increased or decreased. This usually happens when the pattern needs to nest, like this pattern. In the first screenshot below, you can see that row height and pattern height are the same, but there's too much empty space. The rows are all 5", with no overlapping. The black lines define the rows. There is one row between them.
In order to get rid of that empty space, the pattern needs to nest. This is done by changing the Gap.
As the Gap is closed, the pattern nestles into place. You can see that the Gap button is highlighted in the screenshot below. It is being changed by tapping the down arrow, or by sweeping the screen. The rows are now overlapping - the black lines here still define one row, but it has now overlapped the rows above and below it. The pattern is filling the space. In the process its scale has changed - it has become larger.
Look at the numbers - Row Height combined with Gap is the Pattern Height, or specifically in this case where it's hard to see the numbers on the screenshot 5"- -2.463" = 7.463". (the double negative becomes a plus.)
In the rare event that the gap is increased, spreading the rows apart, the gap number will not be a negative.
Changing the Gap, changes the Pattern height.
If the Pattern height is too great after altering the Gap, touch the Row height button and decrease it until the Pattern height is suitable for your machine. Decrease it by either tapping the minus button, sweeping the screen or by using the keypad. If you are a good mathematician, you will be able to enter the correct number on the keypad to get the pattern height you want. (In my case, I just keep guessing.)
Always watch the Pattern height.


No comments:
Post a Comment